
Summary
Step 1: Prepare your floating dock project
Step 2: Assemble the dock frame
Step 3: Consolidate the dock structure with spacers
Step 4: Attach the floats to the dock
Step 5: Form the deck
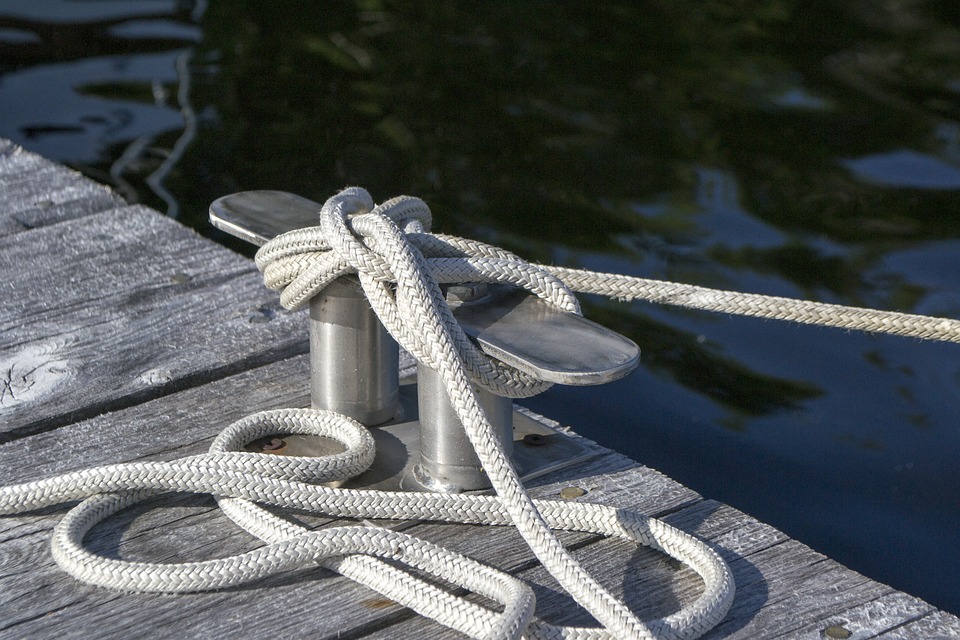
Step 6: Anchor your floating dock
Making a floating dock is not as difficult as it sounds. To moor a boat, to have easy and secure access to a body of water, or simply for the pleasures of swimming, it is the ideal solution. With the method, the right tools and time ahead of you, you can achieve a solid and durable construction.
To find out how to build a floating dock, follow the detailed explanations below.
Materials needed to build a floating dock
| TRCC bolts (round head square collar) | About $13 |
| Adjustable wrench | – |
| Square | $ 4 |
| Mounting bracket | $ 4 |
| Tape measure | From $ 4 |
| Paper + pencil | Already owned |
| Drilling machine | From $ 30 |
| Wood boards | According to species and dimensions |
| Jigsaw | From $ 30 |
| Tasseau | From $ 5 |
| Screws | From $ 2 the bag |
| Screwdriver | From $ 30 |
1. Prepare your floating dock project
Define the surface area of the dock and the choice of floats.
Determine the length and width of the floating dock based on:
– the number of people to be accommodated;
– the load to be supported;
– the size of the craft (boat, kayak, rowboat, etc.) to be moored to the dock.
Choose the size of the floats:
The size of the floats depends on the weight to be supported.
If you install a ladder or guardrails, include the weight of these elements in the load to be supported.
Example: for 2 to 3 persons, 4 floats of 15 cm high are provided to ensure the buoyancy of a 200 kg load.
Also, consider the desired height of the dock.
Good to know: if you want to be as close to the water as possible, opt for floats about 15 cm high.
Make a quick plan of your dock, noting all the dimensions.
Take the necessary materials with you
To make a floating dock, you will need:
– autoclave-treated wood planks;
– wooden cleats;
– steel mounting brackets;
– galvanized steel hardware;
– mooring cleats;
– floats;
– galvanized steel chains;
– dead bodies.
Important: Ask your dealer to choose the right type of float for your dock.
2. Assemble the frame of the dock

Shape the perimeter
Saw 4 planks to the right dimensions to make up the perimeter of the dock.
Position them on high support (trestles, workbench, table, etc.) so that you can access the underside of the dock under construction.
Assemble the planks together by screwing them together laterally, checking their right angle with a square.
Important: Always use galvanized steel hardware to prevent rust.
Then bolt large galvanized steel mounting brackets to the 4 corners of the assembly.
Important: the brackets must extend halfway up the dock. This will then allow the spacers of the dock structure to be attached to them.
Divide the dock into several sections
Divide the dock into equal sections.
Good to know: determine the number of sections according to the size of the dock.
Saw boards to the right length to insert them inside the frame to form the sections.
Position and screw the planks in the perimeter.
Also, secure these interior boards by bolting them with mounting brackets.
3. Consolidate the dock structure with spacers
The sections of the dock must be reinforced with X-shaped braces, fixed on the fixing brackets.
The spacer is a rigid part used to maintain a fixed distance between 2 elements.
In the first section, measure the diagonals with a meter.
Cut 2 boards to these measurements:
– 1 plank will be fixed flat: apply a 45° angle at each end;
– 1 plank will be fixed on the edge.
First fix the spacer flat by screwing it into the fixing brackets.
Then fix the spacer positioned on the edge in the same way.
Repeat these steps for each section of the dock.
This post will now continue in part 2 in our next publication. Stay posted and remember to leave your comments below.